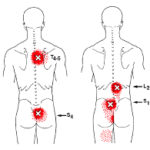
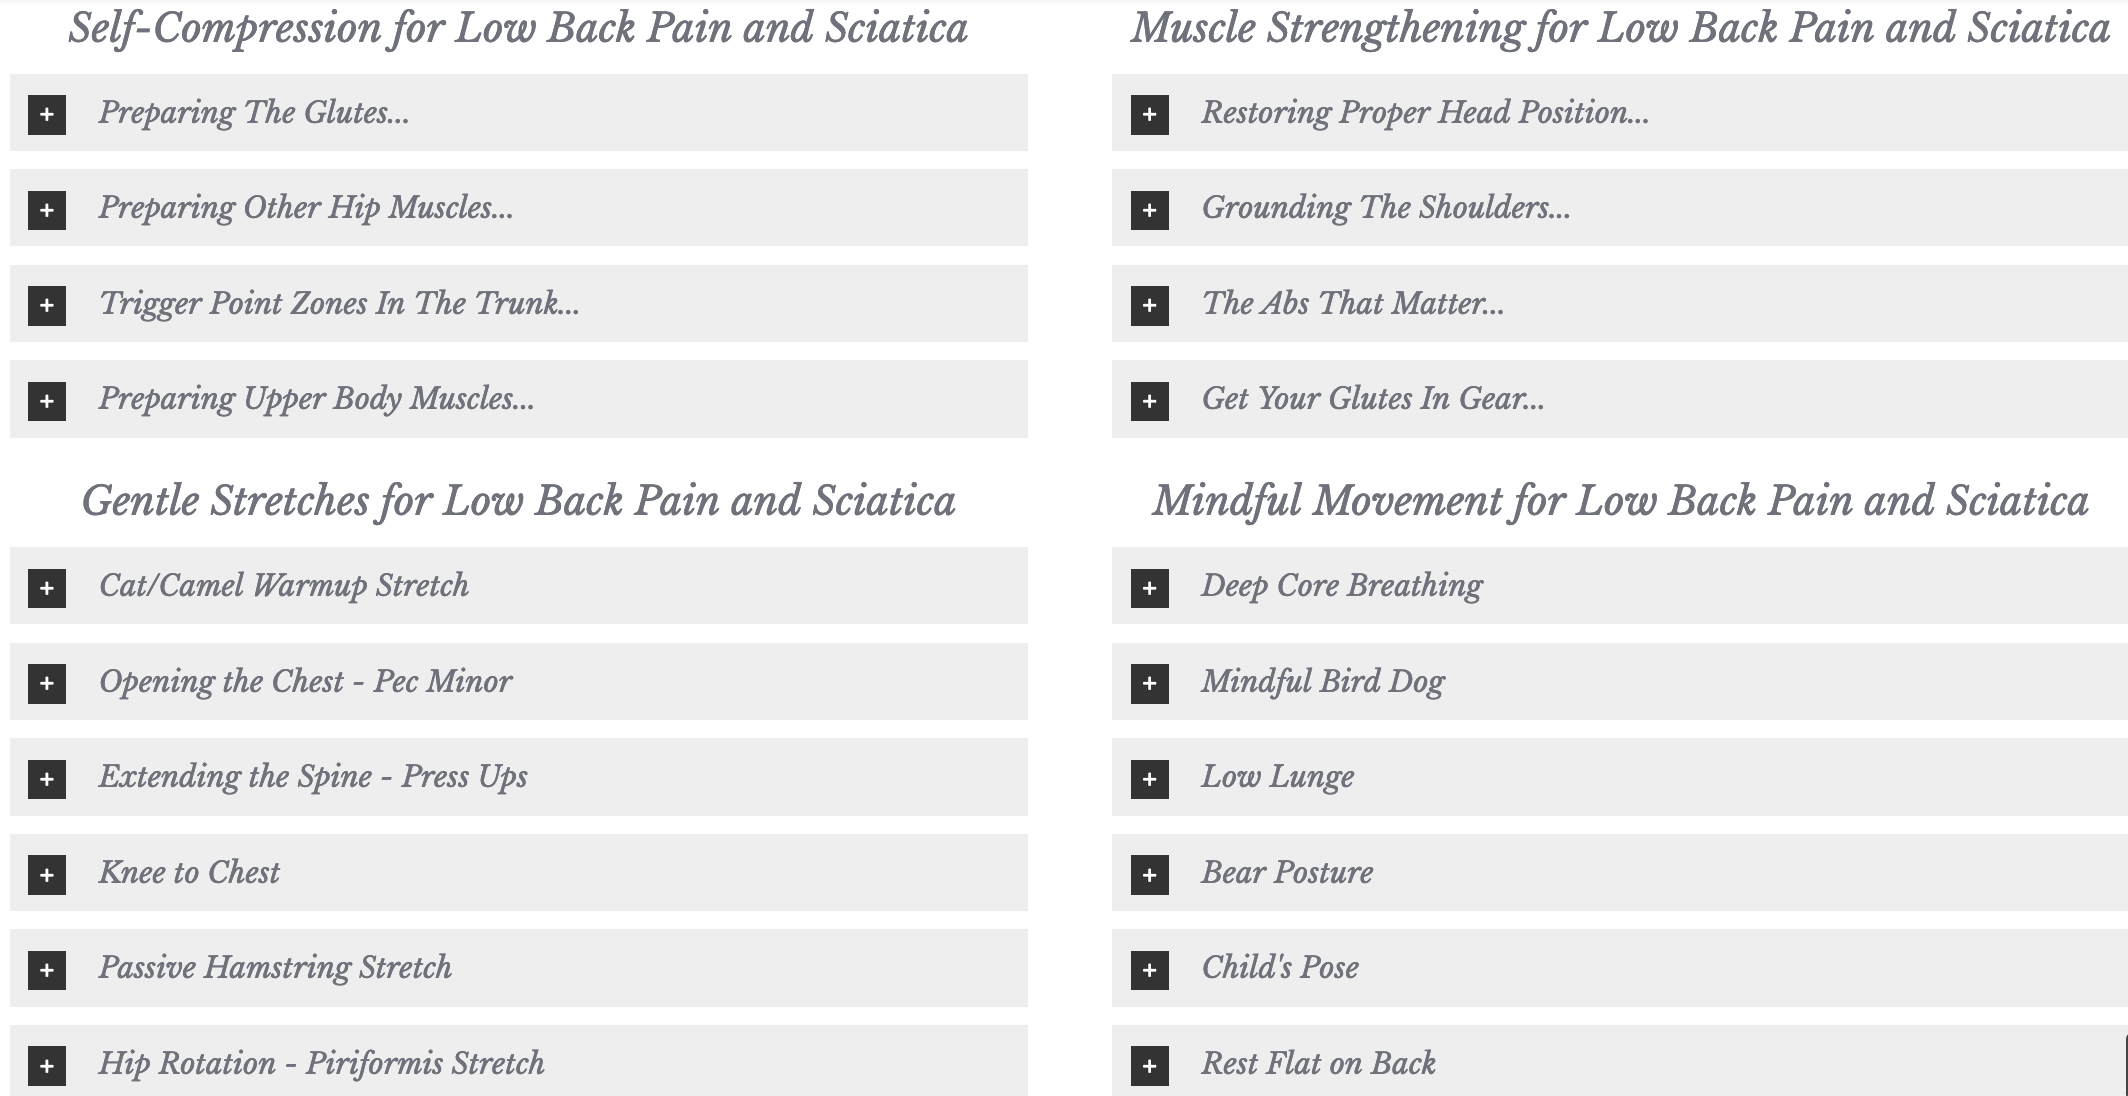
Low Back Pain can be excruciating, but the radiating pain of sciatica can be even worse!
Such pain is often caused by neuromuscular and fascial issues and can be treated conservatively.
These exercises are very similar to those offered for recovery from uncomplicated disc injuries in PT and other environments. When done gently and carefully, as indicated, they are safe and effective. However, if you suspect a disc injury or have been diagnosed with one, please check with your doctor first.
There are many potential causes for the onset of low back and sciatica. However, in virtually every case, muscle imbalances and dysfunction existed long before the injury. In many cases, these factors actually cause injury. Regardless of other treatment options, full recovery over time is not possible without addressing these muscular issues.
Basic Low Back Pain Self-Care Protocol

Most of us spend less and less time on the floor as we age. Some of these exercises require you to do work on the floor. This is a good thing and we encourage you to get comfortable with it.
Take a little time to set the stage for yourself, both mentally and physically. This only takes a moment and in a good way to begin and end a self-care session.
Many of us do not breathe deeply and rhythmically on a regular basis. Doing this allows our own breath to tone our deep abdominal muscles. Stabilizing these important muscles is how diaphragmatic breathing reduces back pain.
The intention of training of these and other core muscles is to provide stability as we move. Breath is the foundation of this stability.
Proper training of deep abdominal muscles begins with diaphragmatic breathing and abdominal bracing.
Begin With Self-Compression

 We’re going to be doing different things with different glute muscles later, but for now, the preparation is the same for all of them.
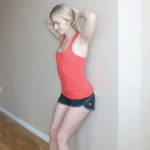
Position yourself with the tennis balls between your glutes and the wall. However, the young lady depicted literally has her hands full with her hair and is depending on constant pressure not to lose the ball…
Instead, put one or two tennis balls in a long sock and tie it up. The sock is your handle and will keep you from chasing balls around the floor! You may also use a lacrosse ball if you prefer something more firm.
The entire process should take no more than 2 minutes per side. Don’t spend more than 10-15 seconds on any given trigger point zone.
There are three key areas that we are looking to target:
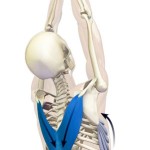
Gluteus Maximus

The is the largest and most superficial glute. It is the “meat” of your butt. Note that you can use a 5″-7″ fitness ball or 6″ foam roller for this as well. Some people prefer to use the floor instead of the wall for more pressure with a wider surface.
You may not have pain in these areas. However, we are preparing to strengthen this muscle and it may need to be awakened, or ‘activated.’ If you have active or latent trigger points, releasing them will facilitate strength training. You can learn more about this muscle here.
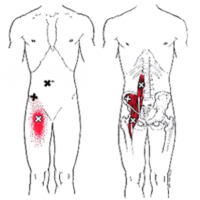
Gluteus Medius
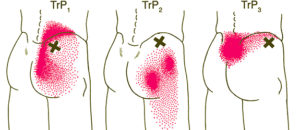
This muscle is a little deeper, quite a bit smaller and rather high and outside in the glute area. It has three primary trigger point zones. Explore with a tennis ball to see if any of them are tender for you.
Along the crest of your hip, there are zones just inches from each other that can refer pain up, down or to the center. This is a potent source of low back pain and sciatica. There is more info about this muscle here.
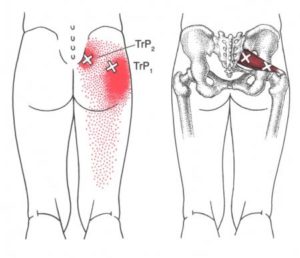
Gluteus Minimis
This is your deepest and smallest glute. It wraps around the head of your femur and is divided into a front and a rear section. The pain pattern radiates down the leg but the trigger point zones are confined to the very top, deep in your glutes and toward the side. Also called the “pseudo-sciatica” muscle, learn more about gluteus minimus here.
The pattern is red represents sciatica-like pain that might radiate down the outside of your leg.
The pattern in black radiates down the back. You may also have both.
These trigger points for these are very close to the gluteus medius above. You will notice the difference in the ‘depth’ of pain and the tendency to refer down your leg.
Gluteus minimis is not necessarily weak in most people. However, because it is so small, it is easy to overload and develop trigger points. Chances are it is short and restricted. Most people with sciatica benefit from compression of this muscle, although it may be painful. Take it slow and easy on this last one!
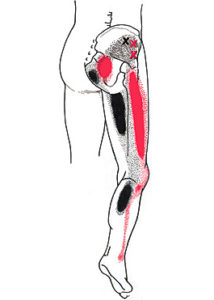
Piriformis
This muscle is our primary external hip rotator. If you rotate you foot outward, away from the center line of your body, piriformis is making that happen. If your feet are chronically rotated out, whether standing or lying down, your piriformis is too short and is distorting flexion and extension of your hip.
In addition, the sciatic nerve runs in close proximity to piriformis, but the exact route varies a lot. In some people, the sciatic nerve runs under piriformis, some over it and in a small percentage this large nerve perforates the muscle. This is the only place where the sciatic nerve is likely to be entrapped by a muscle.
We treat this muscle to reduce hip pain and sciatica down the rear thigh. However, even without pain, we still treat it to restore normal hip mechanics.
Iliopsoas (Psoas)
Psoas is our primary hip flexor. It is one of our deepest and most primitive muscles. It even has its own neurological system! It also anchors the lower body to the spine on the front side. Learn more about iliopsoas here.
This means that it serves a vital role in stabilizing against movement when either the upper or lower body are fixed. For instance, you need your psoas to stabilize against the movement of pushing a vacuum cleaner forward.
Although the muscle lies entirely on the front of the body, most of the pain in generated in the back, along the spine.
Because of the route from the inner thigh in the front, past the hip and deep under our abdominal organs, it can be difficult to access effectively.
Try using a 5″ diameter fitness ball or 12″ softball (about the same size) between your abdomen and the floor, supporting and controlling your weight to manage the pressure.
Hamstrings
These muscles are among the longest and the largest in the body. However, their trigger point zones are rather small and narrow.
 Notice that this zone looks like a horseshoe, located about 3-4 inches above the crease behind your knee.
Releasing these trigger points is necessary to regain full length of shortened hamstrings. We do this with targeted self compression.
Although a roller like the Tiger Tail works OK, a tool like the Jackknobber allows you to sit on the floor and relax into a long sit with targeted pressure on your specific trigger points.
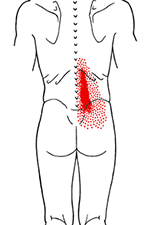
Spinal Erectors
The ‘spinal erector’, longissimus and iliocostalis provide much of the power for extending the spine. However, this does not mean they are meant to be our primary lifting muscles. Lifting comes from the legs. You can learn more about the spinal erectors here.
Our spinal erectors merely help keep the spine straight and erect. This is already a huge job that exposes these muscles to incredible tensile stress.
Like many muscles involved in low back pain, the spinal erectors are primarily in engaged in maintaining dynamic stability while we are moving, standing and sitting.
As you can see, small trigger point zones in longissimus refer down into both the upper and lower glutes. Locating these with a tennis ball between the your back and the wall will help release these trigger points.
Multifidi
 These tiny muscles run in a cross-cross pattern from the center to the edges of just a couple of vertabra at a time. They create a sort of basket-work of small muscles. The relationship between the large spinal erectors and small multifidi is explored further here.
The multifidi are used for more refined movements than the powerful spinal erectors. They help us move with grace, and are used in activities such as gymnastics, dancing and sex.
Small muscles like this are easily overloaded. Trigger points in the multifidi can develop from fairly minor insults. However, these muscles also routinely spasm after a disc herniates or ruptures. The jelly-like contents of the disc, called propulsus, is very irritating and inflames all the tissues close to it, including the nerve roots of the closest multifidi muscle.
When performing self-care, note that the referral zone for these muscles is very small and is typically local to the injured area. For instance, if you have an L4-L5 lumbar disc herniation, it is unlikely that you have a related trigger point at the T4-T5 thoracic level.
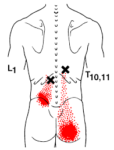
Quadratus Lumborum
 Just as the hip flexors (psoas) knit together the legs and the trunk from the front, the quadratus lumborum does the same from behind. This muscle is implicated in virtually every chronic low back pain case we encounter. There is more information about this important muscle here.
With sudden, acute trigger point activations, the pain is so disabling that you may crawl out of bed on all fours just to use the bathroom!
Although technically not an abdominal muscle, it is continuous with the rear abdominal wall and it not easily accessed from the back. We reach it through the side.
However, even to do this, it is necessary to stretch the side you are accessing into a convex shape – sort of a banana with the curve facing the wall.
Again, we use a tennis ball to locate tender areas and compress trigger points if we find them.
Place the tennis ball at your waist, just between the crest of your hip and your lowest rib. With a bit of exploration, most people find an exiquisitely tender area quickly. Don’t over do it!
Postural issues in your upper body can have a huge impact on low back pain. If your center of mass is extends outside of your base of support, you will need to engage muscles in the low back in an attempt to maintain stability. You can learn more about the most common upper body imbalances here.
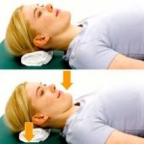
SCM
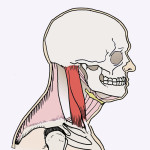 When your deep cervical flexors become inhibited, the Sternocleidomastoid (SCM) muscle can step in to help. Unfortunately, SCM is not designed to flex our neck. Its primary purpose is to act as a ‘check rein’ during sudden neck movements. It prevents us from hyper-extending our neck. However, the orientation of this muscle means that it also pulls our head and neck forward when we use it to flex our neck.
![]() The first step in self-care of the SCM is to perform some gentle self-compression. You can do this more easily by turning to the side you are working on and tucking your chin slightly.
The first step in self-care of the SCM is to perform some gentle self-compression. You can do this more easily by turning to the side you are working on and tucking your chin slightly.
This action creates some slack in the muscle.
Then, gently massage the entire length of the SCM using your thumb and knuckle of your forefinger. If you find a tender area, pause and gently work a little more deeply. As you turn away, as in the photo, you will ‘lose’ the muscle and have only skin in your grasp.
Pec Minor
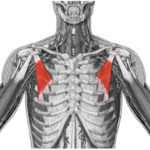 This muscle pulls our shoulders forward and changes our center of mass. This makes our spinal erectors work harder. Opening the chest will also facilitate more relaxed deep breathing. The role of the small pec minor muscles is explored more thoroughly here.
![]() We begin with self-compression using a tennis ball. Locate the area in front of your armpit, near the top of your rib cage. Position the tennis ball against extra molding in a doorframe (the door stop).
We begin with self-compression using a tennis ball. Locate the area in front of your armpit, near the top of your rib cage. Position the tennis ball against extra molding in a doorframe (the door stop).
Then place the area near your rib cage against the tennis ball held in the doorframe. Gently explore, looking for tender areas, and tight bands.
If you find some, explore them and try to release these areas with the tennis ball.
Lower Trapezius
 Our upper traps do all the work when we have our hands below our shoulders. Our lower traps, essential for shoulder stability, are neglected. The importance of shoulder depressors such as the lower traps and serratus anterior is discussed in detail here.
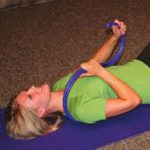 Self-compression will wake up your lower traps and make it easier to strengthen them. When your arms are at your sides the lower traps are much shorter than depicted here.
In that position, you can use a tennis ball in a sock or a well designed tool like the BackKnobber to reach trigger points in your lower traps.
This reclining position allows you to completely relax the shoulder while compressing these trigger points.
Serratus Anterior
 Serratus anterior comes off your ribs and attaches your shoulder blade. It pulls your shoulder blade down and out. This is the other depressor of your shoulder and helps maintain stability of your shoulder and your thoracic spine.
To reach your serratus anterior, we recommend using two tennis balls in a sock between your upper ribs and a wall. This looks a lot like the compression for your quadratus lumborum, except that the tennis ball is located further up your side, along the ribs.
There are 4-5 separate sections of this muscle arising off of individual ribs. The come together at the armpit and connect to the back of your shoulder blade. You may find multiple tender areas. Treat them all, but don’t linger.
Use Gentle Stretches for Key Muscles

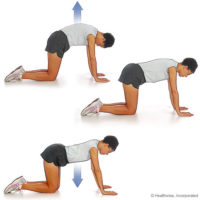 This is a basic warmup, foundation for dynamic neuromuscular stabilization and a gentle stretch for the lumbar spine. Do not perform this exercise if you experience an increase in back pain or sciatica pain.
Begin with awareness of your diaphragmatic breathing as you transition to hands and knees in the yoga ‘table’ pose. Your hands should be shoulder width apart and your knees and ankles should be hip width apart.
Pay close attention to the alignment of your head, neck and back. Check in to make sure that your weight is spread evenly, not just between right and left, but across the fingers of each hand.
As you continue to maintain awareness of breath coming into your belly, allow your abdomen and spine to gently descend into the ‘cat’ pose with the next inhalation. As you exhale, pull up the lumbar spine and extend into the ‘camel’ pose.
Keeping the chest open helps maintain your center of mass over your lower body. 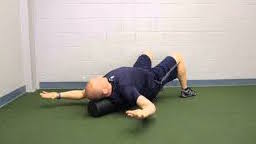 This can greatly reduce the load on your lower back. Do not perform this exercise if you experience an increase in back pain or sciatica pain.
This is “passive stretch” for pec minor, done while lying on a foam roller. Lie down on a foam roller lengthwise. Position yourself on the roller so that it fully supports your head and sacrum. Relax and let gravity do the work for you in a controlled manner.
If you cannot rest your head on the roller without elevating your chin, use a folded towel or small pillow to elevate it for now. You should not feel awkward or off-balance with your entire spine, feet, hands, and arms supported.
Note that in this example, the model has his arms hanging in space. They are hanging because of the tightness of his pecs. However, this makes it impossible to relax, and it would be better to support the arms with yoga blocks or a towel roll until his chest opens further.
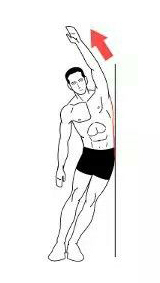
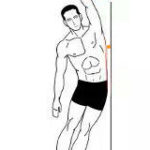
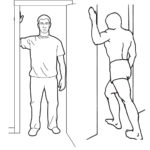 We can stretch our pec minor muscle more actively with a one-arm doorway stretch. In this stretch, place your entire forearm up against the door frame. Then gently step through the doorway with the opposite leg. The stretch comes from the movement of your body, propelled by your legs, not your arm and shoulder.
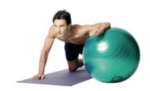 You can try another more active stretch on hands and knees with a large fitness ball. The action is similar to the doorway stretch as you maintain the position of your arm on the ball and sit back on your heels. More information about opening the chest can be found here.
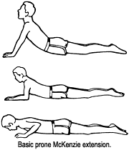 A go-to rehab for rehab of disc problems is the McKenzie ‘press-up.’ This exercise may not be helpful for low back pain from spinal instability, arthritis or stenosis. Do not perform this exercise if you experience an increase in back pain or sciatica pain.
The press-up is similar to the yoga ‘cobra’ pose. However, in cobra, we are assuming a healthy spine and use the muscles of the spine to pull the upper body up and into extension. The arms are used for stability.
In the press-up, we are using the arms to gently support and push the upper body up into extension. Do not force this stretch and stop if it is painful for you. This stretch should be performed up to 10x in a single set.
The knee to chest exercise helps us transition to working on the floor on our back. 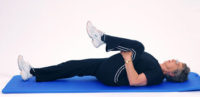 Do not perform this exercise if you experience an increase in back pain or sciatica pain.
We are focusing on gently stretching the spinal erectors and gluteus maximus, while shortening our hip flexors. If you experience muscular pain in the groin or lower abdomen as you bring your knee to your chest, this is probably related to dysfunction in your hip flexors.
You will be strengthening your glutes later, but it is common to have glutes that are both too short and too weak, so a gentle stretch is helpful. Normal range of motion should allow you to pull each knee fully to the chest with moderate effort. Do the best you can.
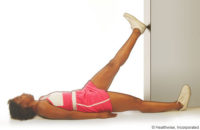 The are almost as many hamstring stretches as cat pictures on the Internet. This version is a very simple passive stretch. However, do not perform this exercise if you experience an increase in back pain or sciatica pain.
Locate a clear and open doorway. It is better if it has no door and is clear on both sides. Otherwise you may need to switch directions for the other leg. Lay down on the floor to one side of it so that one leg can rest on the doorframe. Keep both knees straight.
Only raise your leg as far as you can do comfortably and easily, with no pain or tightness in back of your thigh.
 This gently stretch is easy. However, do not perform it if you experience an increase in back pain or sciatica pain. Remember, is a hip stretch. Do not force either knee flat to the floor if it is painful for you.
In the ’90-90′ stretch, one of your hips is in internal rotation and one of them is in external rotation. In these illustrations, the left leg is rotated externally and the left leg is rotated internally.
 Internal rotation stretch our piriformis, which is an external rotator of the hip. You will probably find that the stretch feels good in both directions. Be gentle and be mindful of the potential strain on your knees.
Strengthen Muscles That Support Your Back

 We recommend starting with a straightforward exercise that you can do lying down, seated, or standing against a wall. We recommend lying down at first so that you can keep the rest of your spine straight and relaxed.
To initiate this movement, begin by slightly tucking the chin, then push your head straight back (down when you are lying on your back) into the mattress or cushion. Hold for one short breath.
Check your upper and lower back – did you use those muscles too? Try again and make a conscious effort to use only your neck. Hold the position for two breaths. Finally, try a third time and hold for three short breaths.
Neck muscles are pretty delicate, so on the first day we are going to stop there. Over successive days you should increase the number of repetitions to 10, increasing the length of the hold from 1 to 10 short breaths as well.
We are using repetitions to build strength and holding the position to build endurance. As you improve, you can transition to a sitting or standing position. With proper assistance and cueing, you can also learn to add resistance safely. These muscles lie deep in our neck, so we must treat them with great care.
You can learn more about the deep cervical flexors here.
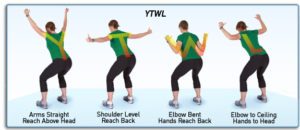 We can activate the lower trapezius muscles by drawing the shoulder blades down while keeping the arms straight. ‘YTWL’ is a series of stabilizing exercises designed to engage the lower trapezius muscle. Note that there is no equipment required. This exercise can be done at any time during the day and almost anywhere, including your desk.
Bend slightly at the hips. It is a little hard to see but the model is making a “thumbs-up” with their hands. This is a CRUCIAL aspect of these exercises. Keep your thumbs pointing back behind you throughout the exercise. Tuck your chin and retract your neck.
Notice the colored lines on the back of the model. These lines indicate the direction in which your muscles should be moving. You can see that there is a constant downward motion towards the hips. When you are going through the exercises visualize your muscles sliding down your back.
Focus on the area highlighted in orange as your prime activation sight. These are dynamic exercises. However, they should perform them in a slow and controlled manner.
Begin with a set of 5 repetitions. Focus on getting the form correct and activating the proper muscles. Gradually increase to 10 repetitions over 1-2 weeks making sure you keep good form. Increase to 2 or 3 sets as desired.
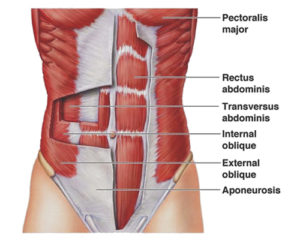
A healthy TA is really important for low back health. This muscle is intimately connected with the diaphragm, the quadratus lumborum (QL) and the iliacus (the ‘ilio’ in iliopsoas). As such, it forms a crucial bridge between breathing and movement. This link begins to clearly develop when we are just a few weeks old.
Many of us do not breathe deeply and rhythmically on a regular basis. This would allow our own breath to tone our deep abdominal muscles. We also don’t effectively use our QL and iliopsoas to stabilize and support the movements of our trunk and our limbs against each other. Our breath can help us with that.
In fact, this inability of this very deep group of core muscles to stabilize against our movement in three dimensions is the essence of chronic low back problems. Stabilizing these important muscles is how diaphragmatic breathing reduces back pain.
Our spines suffer because the muscles and connective tissue at this critical junction are no longer working together effectively.
Deepening Your Diaphragmatic Breathing
So, we’ve clarified what core muscles are and some of the ways they relate to low back pain. What can we do about it?
- Situps and other abdominal exercises will NOT help and may actually cause back pain.
- Proper training of the deep abdominal muscles begins with diaphragmatic breathing and abdominal bracing.
- Practice deep rhythmic belly breathing to tone the diaphragm.
- Practice abdominal bracing technique with the TA against the breath. This tones this muscle as well.
The intention of training of these and other core muscles is to provide stability as we move. Breath is the foundation of this stability.
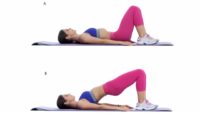 Our gluteus maximus, the largest glute, needs to be strong to do its job of extending our legs as we walk and run. Our glutes also help us maintain stability in the lower body. You can learn more about the role of gluteus maximus and medius here.
Strengthening of glute max, can be done with a glute bridge. First, re-establish your breath. Then squeeze the glutes together and imagine the glutes pushing the spine up. You may feel that your quads and abs pulling are pulling up, but focus on the glutes pushing up.
Hold for one slow breath and lower VERY slowly. Imagine placing one vertabra at a time down on the flow as you descend. This slow descent is important because it also trains the multifidi in our back. This is one way to safely regain fine, segmental control of our spine.
Move Mindfully To Reprogram Your Body

Deep, diaphragmatic breathing is the foundation of stability in all of our movements. 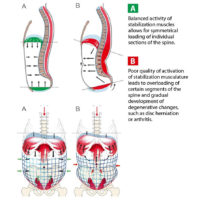 As you proceed through the subsequent exercises, try to maintain a connection of deep breathing throughout.
To relax and take gently gain control of your breath, try this simple deep breathing exercise. Exhale slowly and fully, expelling all the stale air in your lungs. Do not think much about inhaling – it will take care of itself. Keep your mouth closed and inhale completely through your nose.
 If you can bring you awareness to your belly, try to feel your breath descending into it. Don’t worry if you feel like you can’t control it well at first. Just keep breathing.
This delivers more oxygen to your blood stream, positively impacting the brain and the central nervous system, bringing down those chronic stress levels and you can do it any time you need to.
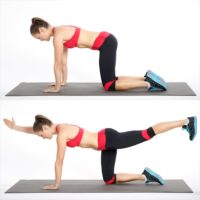 This is a classic rehab exercise for a variety of low back problems. It is a foundation for a variety of other positions, including a number of plank variations. Do not perform this exercise if you experience an increase in back pain or sciatica pain.
Begin with establishing the table pose the we used earlier in the cat/camel exercise. However, this time, we are going to maintain that stability while extending each arm and leg individually. Next, you can alternate combined arms and legs diagonally on each side.
Note that the point of this exercise is NOT to master the movements. It is to master the stability of the rest of your body, regarding of the movements you are making.
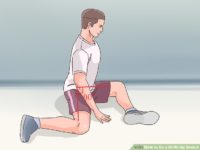
There are many ways to stretch the iliopsoas. 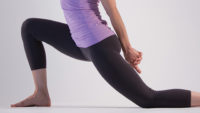 One easy and safe way that requires no equipment is the low lunge. Do not perform this exercise if you experience an increase in back pain or sciatica pain.
Focus on maintaining deep diaphragmatic breathing throughout this exercise.
As you can see, for this purpose, the movement of is forward (not “deeper”) to provide gentle extension of at the hip for the trailing leg. Some YouTube videos provide is a good illustration of a safe active psoas stretch with warmup and a deep low lunge.
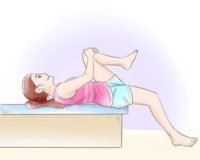
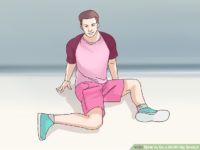
Many people do better with a passive psoas stretch, often done by letting the leg hang off the end of a table, extending the hip. We prefer supporting the flexed leg on a stool or similar rather than pulling it to the chest. Put a pillow on the floor for your foot. Ideally the height of the table allows you to barely touch a pillow when you begin. It should sink in thoroughly as the psoas releases.
Part of re-establishing dynamic stability while moving is perfecting foundational steps. 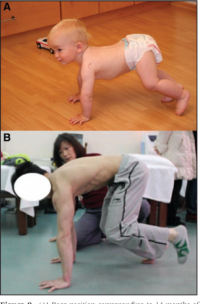 Bear posture is one of them. Do not perform this exercise if you experience an increase in back pain or sciatica pain.
Most of these positions are similar to developmental postures we assumed as infants and toddlers.
In bear posture, we are advancing the basic table position used for the bird dog exercise by raising the hips. However, unlike a yoga posture such as downward facing dog, we are deliberately bending the knees.
After establishing stability in this position we challenge our own stability by removing one arm or leg at a time, similar to the bird dog exercise. However, this is more difficulty because the position is fundamentally less stable.
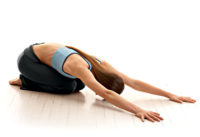 As we finish our sequence, relax into child’s pose. If you find that it is difficult or uncomfortable or relax fully into this position, try a supported version of the pose. Do not perform this exercise if you experience an increase in back pain or sciatica pain.
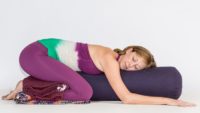 This is a passive stretch of your glutes, quads, chest and spinal erectors. The idea is that you are ‘hinging’ at the hips, rather than flexing the lower spine.
This is also an opportunity to deepen your breath, even while your trunk is slightly compressed. Try to spend several minutes focused on this.
Finish the sequence with mindful relaxation and deep breathing.
 First, lie flat on your back. Bolster your knees if needed.
As you close your eyes and begin to relax, simply try to bring your breath into your belly. Next, attempt to brace your transversus abdominis (TA) against your breath. Finally, attempt to isolate the TA while keeping the rectus abdominis soft.
Maintain your attention on your breath for at least 3-5 minutes. Gradually begin to move gently, roll side to side and eventually to over to your hands and knees. Finally, get up slowly and prepare to resume your day!
…and Feel Better!

Download the one page cheat-sheet here